Nowadays, a lot of cybersecurity professionals use IDA Pro as their primary tool for reverse engineering. While IDA is a complex tool that implements a multitude of features useful for dissecting binaries, many reverse engineers use various plugins to add further functionality to this software. We in the Global Research and Analysis Team do the same – and over the years we have developed our own IDA plugin named hrtng that is specifically designed to aid us with malware reverse engineering.
We started working on hrtng back in 2016, when we forked the hexrays_tools plugin developed by Milan Bohacek. Since then, our highly experienced reverse engineer Sergey Belov has added lots of features to this tool, especially those that IDA lacked, from string decryption to decompiling obfuscated assemblies. Sometimes the capabilities we needed were implemented in existing and often abandoned plugins – in this case we integrated the obsolete code into hrtng and kept it updated to work with the latest versions of the ever-changing IDA SDK.
We recently decided to share hrtng with the community and published its source code on GitHub under the GPLv3 license – and in this article we want to demonstrate how our plugin makes it easier for a malware analyst to reverse engineer complex samples. To do that, we will analyze a component of the FinSpy malware, a sophisticated commercial spyware program for multiple platforms. While demonstrating the capabilities of our plugin, we will also provide some general tips for working with IDA.
If we open our sample in a HEX editor, we can see that its first two bytes are 4D 5A – the signature for Windows executables.
However, if we load it into IDA, we see that IDA fails to recognize the binary as an executable. So we have no choice but to load the sample as a binary file.

When we do that, IDA displays the bytes of the loaded file. If we disassemble them, we can see that the 4D 5A sequence is not the header of the EXE file; instead, these bytes are part of the following shellcode:
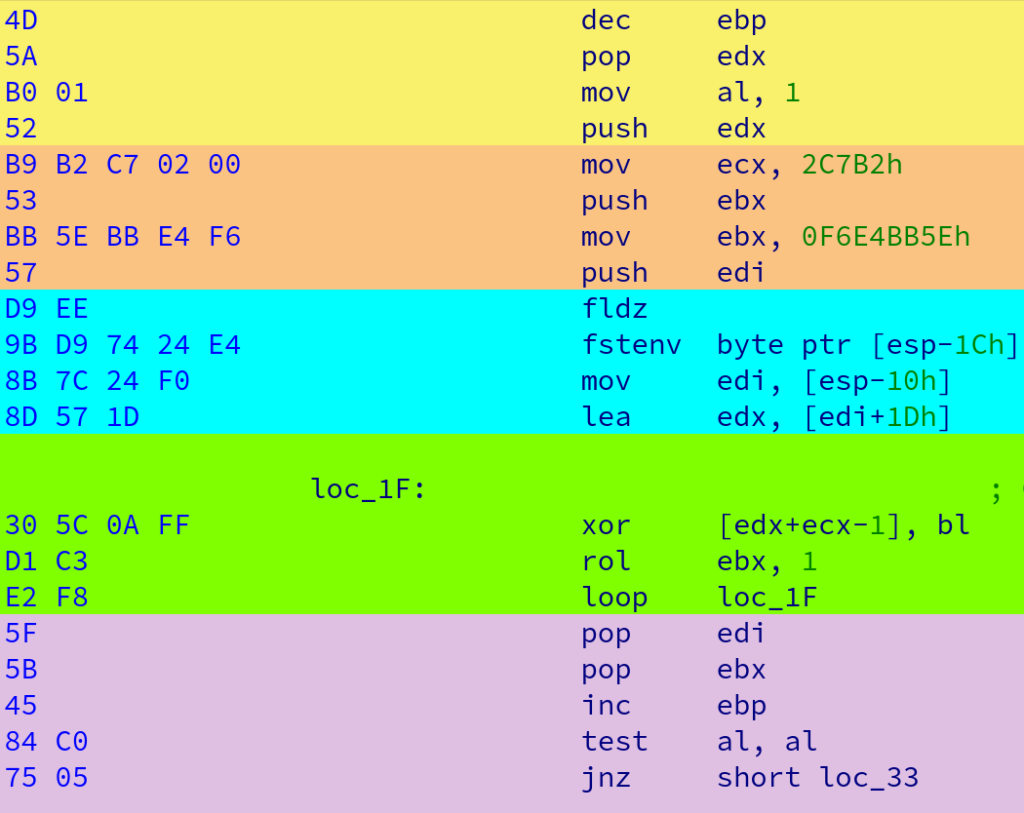
As can be seen from the screenshot above, the first few instructions (highlighted in yellow) are of little value, as they are placed primarily to disguise the shellcode as a PE file. If we further examine the orange part of the code, we can see two interesting constants are assigned there, namely 0x2C7B2 and 0xF6E4BB5E. Next, the blue part contains two instructions, fldz and fstenv. Notably, this combination of instructions is often used in malware to get the value of the EIP register and thus identify the shellcode address. After obtaining this address, the shellcode increases it by 0x1D, saving it in the EDX register using the LEA instruction.
How is it possible to obtain the value of EIP using the fldz and fstenv instructions?
If we search for the description of the fldz and fstenv instructions in the Intel processor documentation (paragraphs 8.3.4 and 8.1.10), we can see that the fldz instruction saves the zero constant to the floating point unit (FPU) stack. In turn, the fstenv instruction retrieves the current state of the FPU, which is stored in the following format:

To understand how the shellcode uses the FPU state, we can import the following state structure into IDA:
|
struct sFPUstate { int cw; int sw; int tw; int fip; int fis; int fdp; int fds; }; |
We can further apply this structure to the variable containing the state and observe that the code uses the fip field of this structure:

From the documentation, we can infer that this field contains the instruction pointer value of the FPU – in the case of our shellcode, it stores the address of the fldz instruction.
After retrieving its own address, the shellcode enters a loop, highlighted in green. Its body contains two instructions, XOR and ROL. As you can see from the screenshot, the first operand of the XOR instruction contains the EDX register – and as we just discussed, it stores the address of the shellcode. As a result, the shellcode applies the XOR operation to its own bytes, thus decrypting itself. We can also observe that the decryption key is stored in the EBX register, with its value assigned in the orange part of the shellcode. As for the number of bytes to be decrypted, it is assigned the value 0x2C7B2 stored in the ECX register.
To continue our analysis, we need to decrypt the shellcode, and this can be done in multiple ways, for example, by writing an IDAPython script or with a standalone C program. It’s also convenient to perform decryption with the hrtng plugin; to do so, we can select the encrypted blob using the Alt + L hotkey and then open the Decrypt data window by pressing Shift + D. In this window we can specify the encryption key and algorithm to be used. Our plugin implements the most popular algorithms such as XOR, RC4 or AES out of the box, making it possible to perform decryption with just a few clicks.
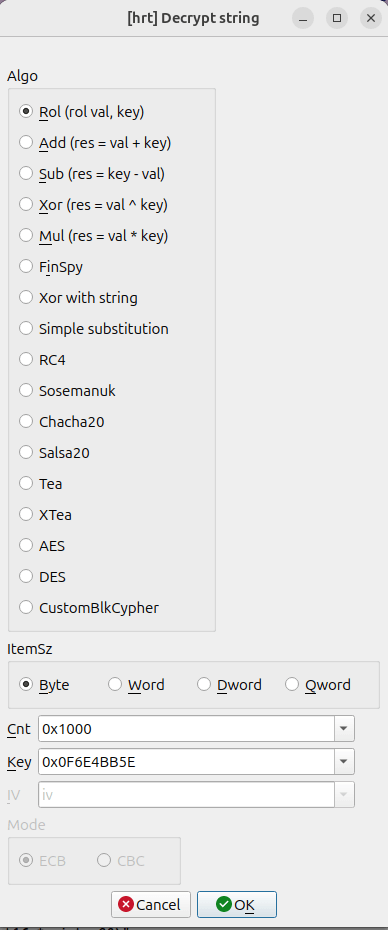
To decrypt our shellcode, we need to select the FinSpy algorithm in the window of the above screenshot and set the key 0xF6E4BB5E. Once the decryption is complete, we can continue to analyze the malicious payload.
More details on how to decrypt data with our plugin are available in the following video:
How to add a custom decryption algorithm to the plugin
It is possible to add a custom encryption algorithm to the plugin by implementing it in the decr.cpp file. The decryption algorithm needs to be specified either in the decrypt_char (for stream ciphers) or decr_core (for block ciphers) function. The plugin code contains case eAlg_Custom and case eAlg_CustomBlk placeholders that can be used as a reference for implementing custom algorithms:
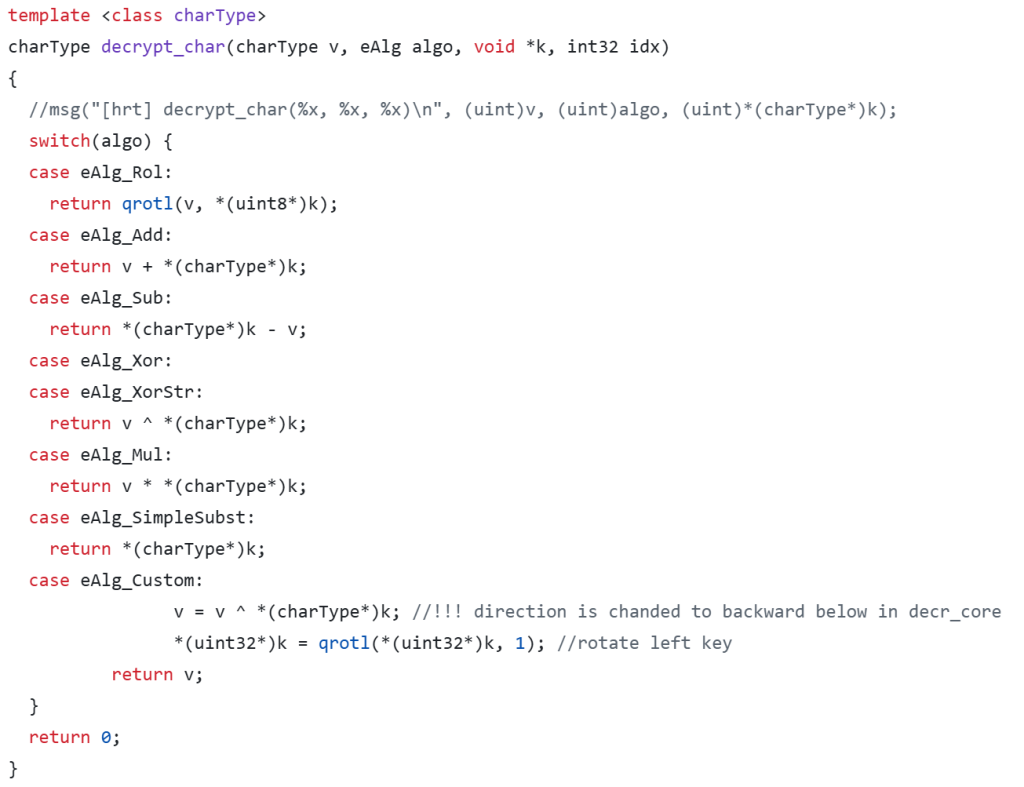
After recompiling the plugin’s source code, the algorithm will be available for use in the ‘Decrypt string’ window.
After the decryption loop finishes, the instructions highlighted in purple transfer execution to the decrypted code. If we look at what is located below the purple section, we can see null bytes followed by this data at offset 0x108:
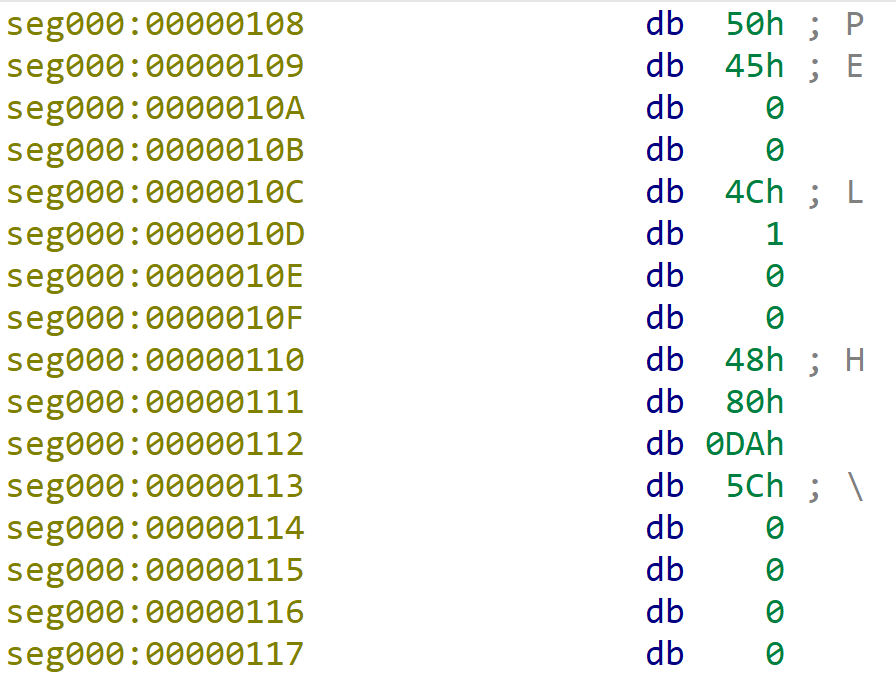
The byte sequence in the screenshot above starts with bytes 50 45 (PE), which serve a signature of PE file headers. At the same time, our shellcode starts with bytes 4D 5A (MZ), the magic bytes of PE files. As we can see, our shellcode has decrypted itself into a PE file, and now we can dump the decrypted payload to disk using the Create DEC file feature of the hrtng plugin:
As it turned out, decrypting the shellcode alone didn’t pave the way for further successful analysis. When we open the decrypted payload into IDA, we immediately notice that it fails to load correctly because its import table contains junk values:
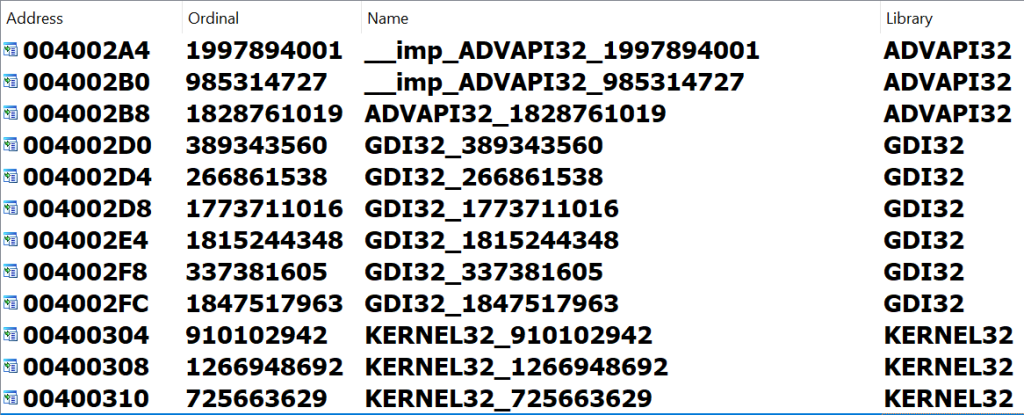
This makes it impossible to proceed with the analysis of the loaded file, as we are unable to understand how the shellcode interacts with the operating system. To further analyze why the import table processing went wrong, we need to continue analyzing the purple part of the shellcode.
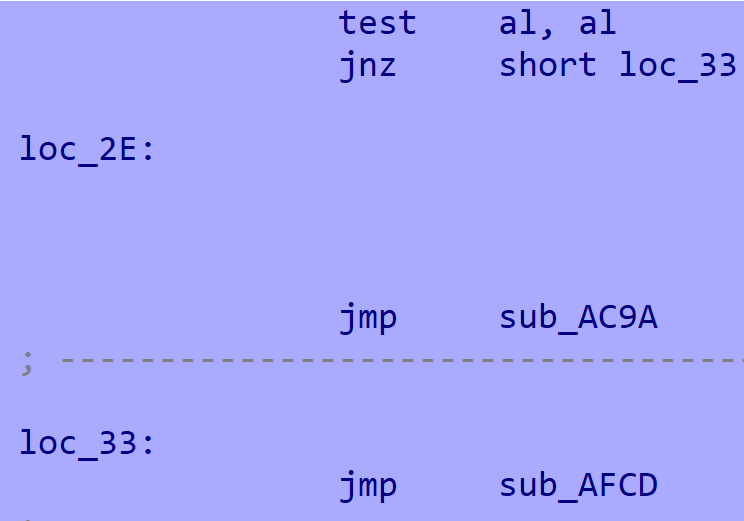
The code above transfers execution to a function coded in C, and we can decompile it for further analysis. Note that the hrtng plugin includes a component that makes reading the decompilation more convenient by highlighting curly brackets used in ‘if’ statements and loops. It is also possible to jump from one bracket to another by pressing the [ and ] hotkeys:
Upon examining the decompiled function, we can see that it first calls the sub_A9D8 function multiple times. We can also see that its second argument always contains a large number, such as 0x5C2D1A97 or 0xE0762FEB. In turn, the sub_A9D8 function calls another function named sub_A924. Its code contains the 0xEDB88320 constant, known to be used in the CRC32 hashing algorithm:
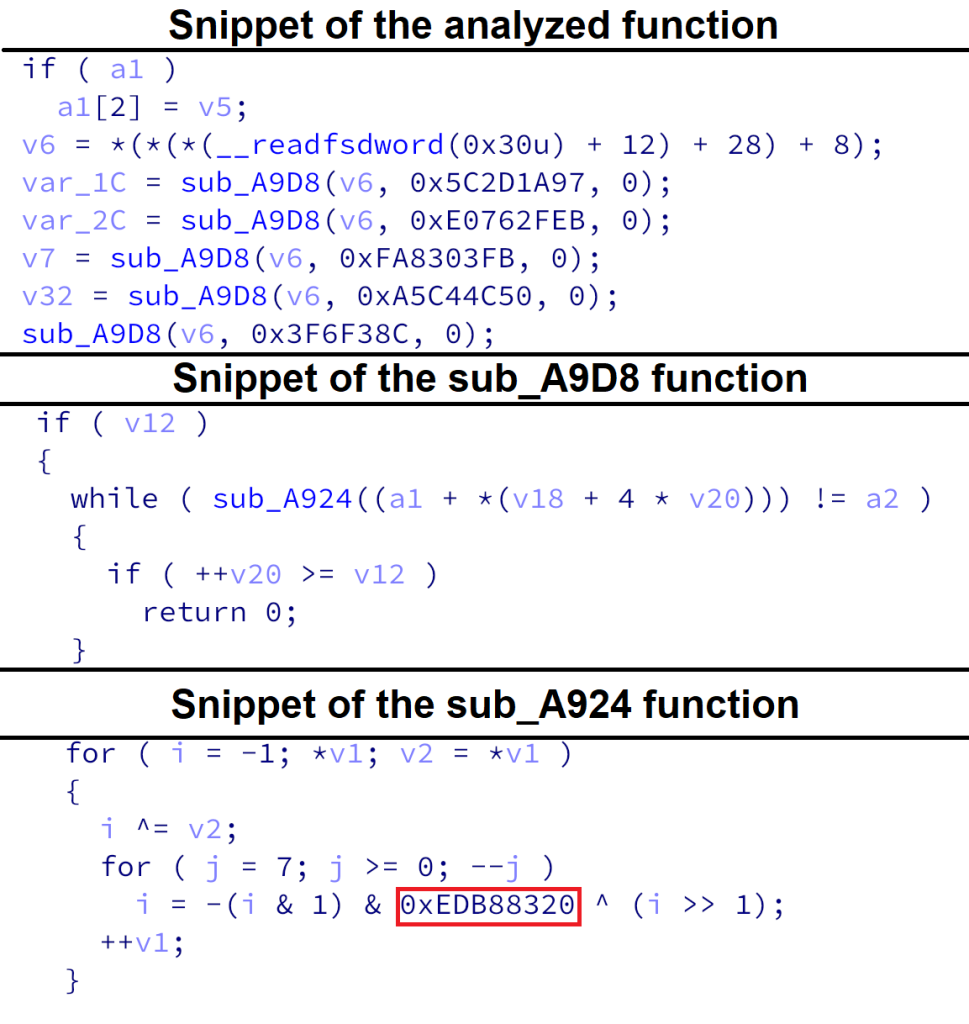
Speaking of hash functions such as CRC32, they are often used in malware to implement the Dynamic API Resolution defense evasion technique, which is used to obtain pointers to Windows API functions. This technique uses hashes to prevent strings with suspicious API function names from being included in malicious binaries, making them stealthier.
Our shellcode uses the CRC32 hash for the exact purpose of implementing the Dynamic API Resolution technique, to conceal the names of called API functions. Therefore, in order to continue analyzing our shellcode, we need to match these names with their corresponding CRC32 hash values (e.g., match the NtAllocateVirtualMemory function name with its hash 0xE0762FEB). Again, the hrtng plugin makes this process very simple with its Turn on APIHashes scan feature, which automatically searches disassembled and decompiled code for API function name hashes. When it finds such a hash, it adds a comment with its corresponding function name, renames the function pointer variable, and assigns it the correct data type:
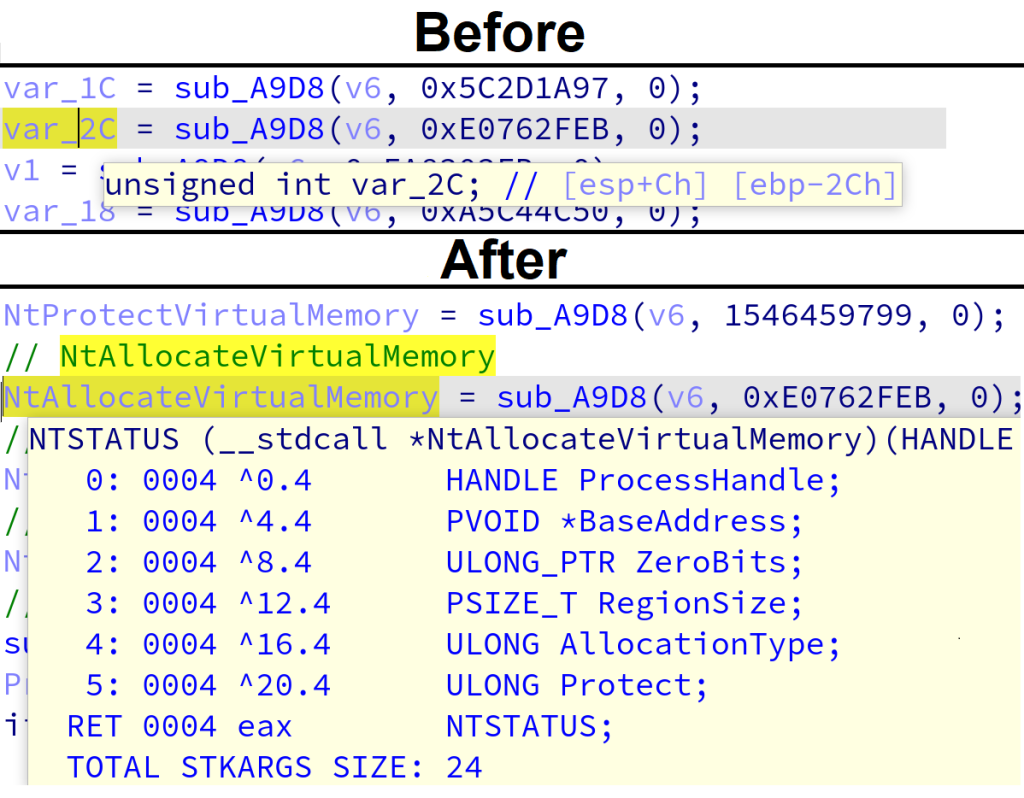
To use this feature, it is first necessary to import Windows type libraries (such as mssdk_win10 and ntapi_win10) into IDA using the Type Libraries window, which can be accessed via the Shift + F11 hotkey. After that, searching for API hashes can be activated using the instructions in the video below:
Now that we have recovered the names of API functions concealed with API hashing, we can continue analyzing the analyzed function, namely the following code snippet:
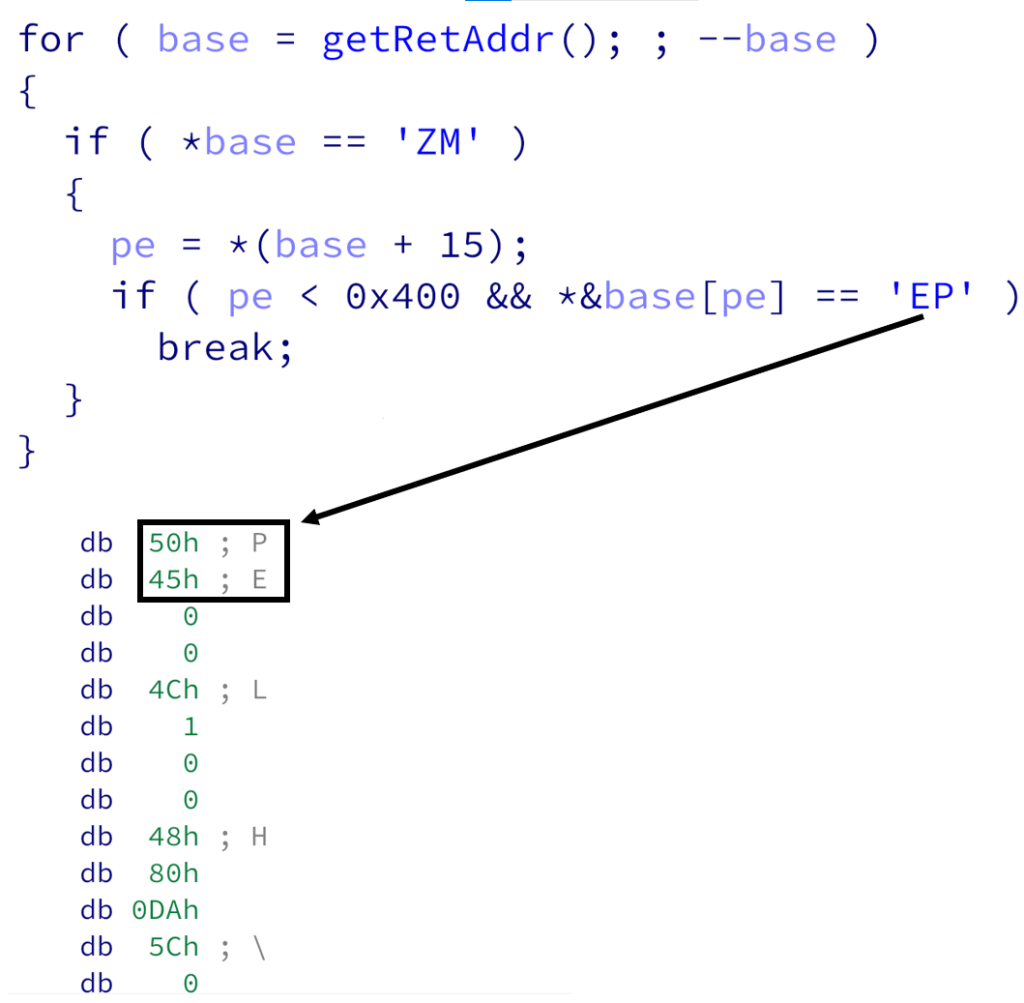
The code above executes a loop to search for two signatures, 4D 5A (MZ) and 50 45 (PE). As we mentioned earlier, these are signatures used in PE file headers. Specifically, the byte sequence 50 45 is used in PE files to mark the beginning of the IMAGE_NT_HEADERS structure. So we can apply this structure to the bytes we have:
From the video we can see that the structure has been applied correctly, as its field values match those specified in the PE file documentation. For example, the FileHeader.Machine field contains the number 0x14C (IMAGE_FILE_MACHINE_I386), and the OptionalHeader.Magic field has the value 0x10B (PE32).
After retrieving the contents of the IMAGE_NT_HEADERS structure, the shellcode parses it. It is noteworthy that such parsing is often observed in code used to load PE files in memory. What is also important about the IMAGE_NT_HEADERS structure is that it contains the import directory offset, which is stored in the OptionalHeader.DataDirectory[1].VirtualAddress field and equal to 0x1240C.
As for the import directory, it is defined as an array of IMAGE_IMPORT_DESCRIPTOR structures. To assign these structures to the import directory in IDA, we can first import the definition of the IMAGE_IMPORT_DESCRIPTOR structure type and then apply it to the contents of the directory:
Regarding the contents of the defined structures, their first value, named OriginalFirstThunk, should point to an array of imported function names. However, if we look at the structures we just defined, we can see that this field is set to zero. This means that something must be wrong with our defined structures:
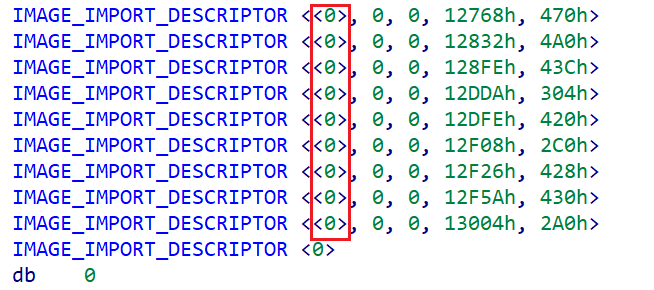
If our malware was an ordinary PE file, encountering zero values in this field would be impossible. However, remember that we are not analyzing a PE file, but rather shellcode that resembles a PE file. Because of that, it is possible that the malware developers tampered with the import directory, presenting an obstacle for researchers. Therefore, to further understand what is wrong with the defined structures and how they store names of imported functions, we need to further examine other fields of these structures.
The fourth field in this structure is called Name, and it includes the name of the library that contains the imported functions. It appears to be set correctly – for example, the shellcode contains the msvcrt.dll string at offset 0x12768. However, this is not the case with the last field, named FirstThunk, because the offsets specified in it point to odd-looking addresses. However, if we start defining members of this array as 4-byte integers, the hrtng plugin will recognize them as CRC32 API hashes, making it easy to understand which functions are being used by the malicious code. It is also worth noting that for each imported function, the plugin automatically restores their argument names and data types:
As it turns out, our shellcode processes imports by extracting function names from arrays of FirstThunk fields. Specifically, it iterates over functions exported by Windows system libraries and calculates the CRC32 hash of each function name, until the hash value matches the one from the array. After finding the matching function, the shellcode stores its address in the FirstThunk array, overwriting the CRC32 hash value.
Now that we have dealt with the imports, we can start analyzing the entry point function. To do this, we can rebase the shellcode to the address specified in the OptionalHeader.ImageBase value and then disassemble the entry point function code at address 0x407FB8 (specified in the OptionalHeader.AddressOfEntryPoint field).
We can see that this function has the following code:
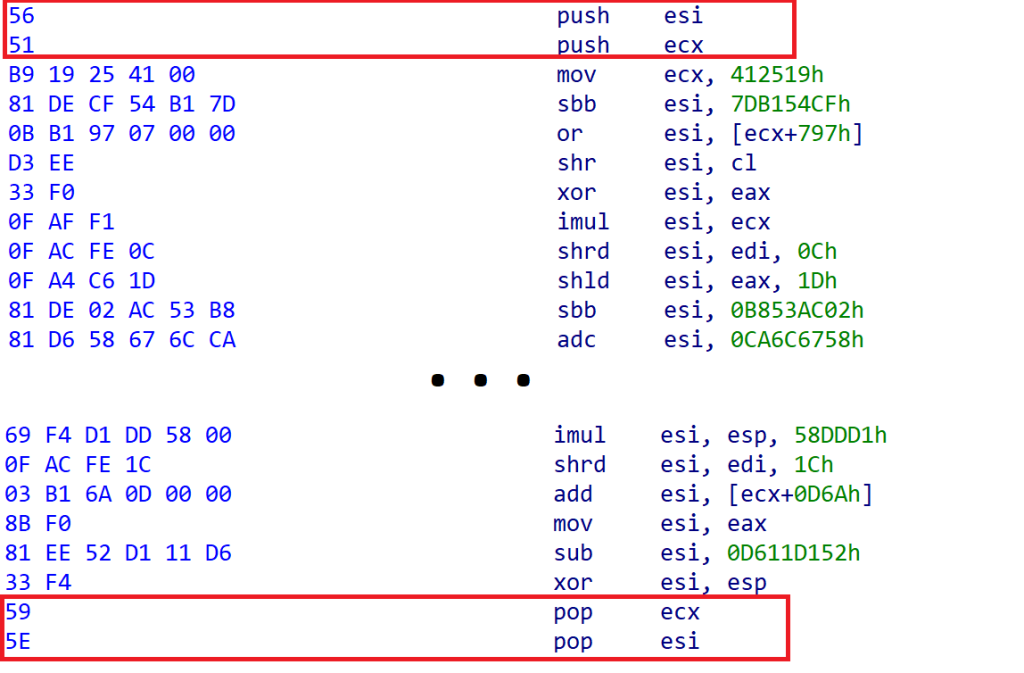
This code first pushes the values of the ESI and ECX registers on the stack. It then performs various calculations involving the ESI register, such as addition, subtraction or XOR. After all the calculation instructions have been executed, the shellcode restores the values of the ESI and ECX registers using the POP instruction. As the shellcode overwrites the value in the ESI register computed by the calculation instructions, these instructions are meaningless and have been inserted to confuse the disassembler. The hrtng plugin contains a useful feature to quickly remove them – this can be done by selecting the junk code and applying the Fill with nops operation to it:
As you can see from the screenshot below, the entry point function then transfers execution to the instruction at address 0x402E40:

This address contains code that is obfuscated with yet another technique. In the screenshot below, we can see two opposite conditional jumps, ja (jump if above) and jbe (jump if below or equal), that transfer execution to the same address. Therefore, these two conditional jumps are equivalent to a single unconditional jump, and inserting these jumps prevents IDA from correctly analyzing the function.

To efficiently combat such obfuscations involving conditional and unconditional jumps, the hrtng plugin contains a unique feature called ‘Decompile obfuscated code’. It can be activated with the Alt+F5 hotkey, and as the video below shows, it can process our obfuscated code and decompile it in just a few keystrokes:
If we perform an open source search on the decompiled code from the video, we will be able to identify it as the engine of the FinSpy VM virtualization-based obfuscator. As deobfuscating virtual machines is an extremely tedious reverse engineering challenge, we will not cover it in this article, instead advising interested readers to read the following research papers.
To devirtualize the code in our sample that is protected by FinSpy VM, we will use a ready-made script available here. However, to work correctly, this script must place the functions of the FinSpy VM engines in the correct order to determine the correct virtual instruction opcode values.
Because the order of the virtual machine engine functions is different in each FinSpy sample, we need to name these functions in IDA to retrieve this order. In general, when dealing with function name identification, it is very common to use tools that perform code signature recognition. A popular example of such a tool is FLIRT, which is built into IDA and uses disassembly to compute code signatures. Unfortunately, FLIRT does not work correctly with the engine functions in our sample because their disassembly is heavily obfuscated. Nevertheless, the hrtng plugin implements a more robust alternative of FLIRT called MSIG, which is based on decompiled rather than disassembled code, and we can leverage it to successfully recognize functions in our binary. This can be done using the ‘File -> Load file -> [hrt] MSIG file’ menu.
Once all the functions are recognized, the deobfuscation plugin will be able to function correctly and produce the decompiled code of the malware. Note that thanks to the hrtng plugin, it looks as if it was never obfuscated:
The sample we reverse engineered in this article is quite complex, and we had to go through numerous steps to analyze it. First, we learned how the shellcode placed at the beginning of the sample works, and then we examined the modified PE file contained in the shellcode. While analyzing it, we studied multiple PE format structures, and tackled various obfuscation techniques such as API hashing, junk code insertion and code virtualization. We certainly wouldn’t have been able to do all that so efficiently without hrtng – this plugin can automate complex reverse engineering tasks in just a few clicks.
Actually, this plugin contains many more features than we have described in this article. You can find the full list of features as well as the plugin source code and binaries on our GitHub. We hope you find our plugin useful for automating your malware analysis workflow!

