
Scaling microservices for holiday peak traffic is crucial to prevent downtime and ensure a seamless user experience. This guide explores Azure DevOps automation, CI/CD pipelines, and cost-optimization strategies to handle high-demand traffic seamlessly. Manual scaling quickly becomes a bottleneck as organizations deploy dozens, sometimes hundreds, of microservices powered by distinct backend services like Cosmos DB, Event Hubs, App Configuration, and Traffic Manager.
Multiple teams juggling these components risk costly delays and errors at the worst possible moments. This is where automation comes in: a game-changing solution that transforms complex, error-prone processes into streamlined, efficient operations.
In this article, you’ll explore how automated pipelines can not only safeguard your systems during peak traffic but also optimize costs and boost overall performance in this Microservice world.
The Challenge in a Microservices World
Imagine a project with over 100 microservices, each maintained by different engineering teams. Every service may have its backend components, for example, as shown below:
- Cosmos DB: Used for storing data with low-latency access and high throughput.
- Event Hubs: Ingests telemetry and log data from distributed services.
- App Configuration: Centrally manages application settings and feature flags.
- Traffic Manager: Routes user traffic to healthy endpoints during failures.
Manual Scaling Is Inefficient
Coordinating these tasks manually is cumbersome, especially when production issues arise. With multiple teams, interacting and collaborating on each microservice’s scaling and configuration can be overwhelming. This is where CI/CD pipelines and Infrastructure-as-Code (IaC) automation become crucial.
Automation not only reduces human error but also provides a unified approach for rapid, reliable scaling and updates.
Understanding Each Component
AKS (Azure Kubernetes Service)
AKS is a managed Kubernetes service that simplifies deploying, scaling, and managing containerized applications. In a microservices environment, each service can be deployed as a container within AKS, with independent scaling rules and resource allocation. This flexibility enables you to adjust the number of pods based on real-time demand, ensuring that each service has the computing resources it needs.
Cosmos DB
Azure Cosmos DB is a globally distributed, multi-model NoSQL database service that delivers low latency and high throughput. In a microservices architecture, each service may have its own Cosmos DB instance to handle specific data workloads. Automation scripts can dynamically adjust throughput to meet changing demand, ensuring your service remains responsive even during peak loads.
Event Hubs
Azure Event Hubs is a high-throughput data streaming service designed to ingest millions of events per second. It’s particularly useful in microservices for collecting logs, telemetry, and real-time analytics data. By automating the scaling of Event Hubs, you ensure that your data ingestion pipeline never becomes a bottleneck, even when the number of events spikes during high-traffic periods.
App Configuration
Azure App Configuration is a centralized service that stores configuration settings and feature flags for your applications. In a microservices ecosystem, different services often need unique settings or dynamic feature toggles. Instead of hard-coding these values or updating configurations manually, App Configuration provides a single source of truth that can be updated on the fly. During peak traffic, a microservice can instantly disable resource-heavy features without redeployment.
Traffic Manager
Azure Traffic Manager is a DNS-based load-balancing solution that directs user traffic based on endpoint health and performance. For microservices, it ensures that requests are automatically rerouted from failing or overloaded endpoints to healthy ones, minimizing downtime and ensuring a seamless user experience, especially during high-stress scenarios like holiday peak traffic.
The Traffic Manager ensures disaster recovery by rerouting traffic from a failed region (e.g., East US) to a healthy backup (e.g., West US) in under 30 seconds, thereby minimizing downtime.
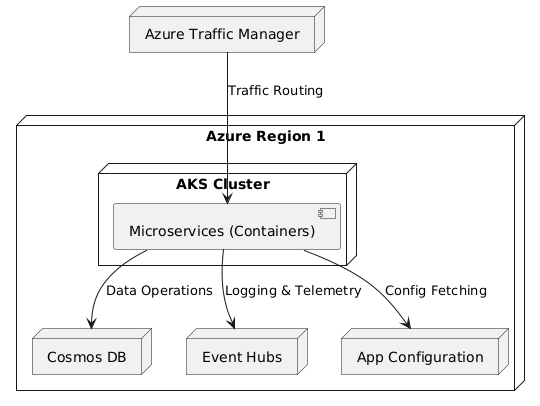
Figure 2: High-level view of user traffic flowing through Azure Traffic Manager to an AKS cluster with containerized microservices, which interact with Cosmos DB, Event Hubs, and App Configuration for data, logging, and real-time updates.
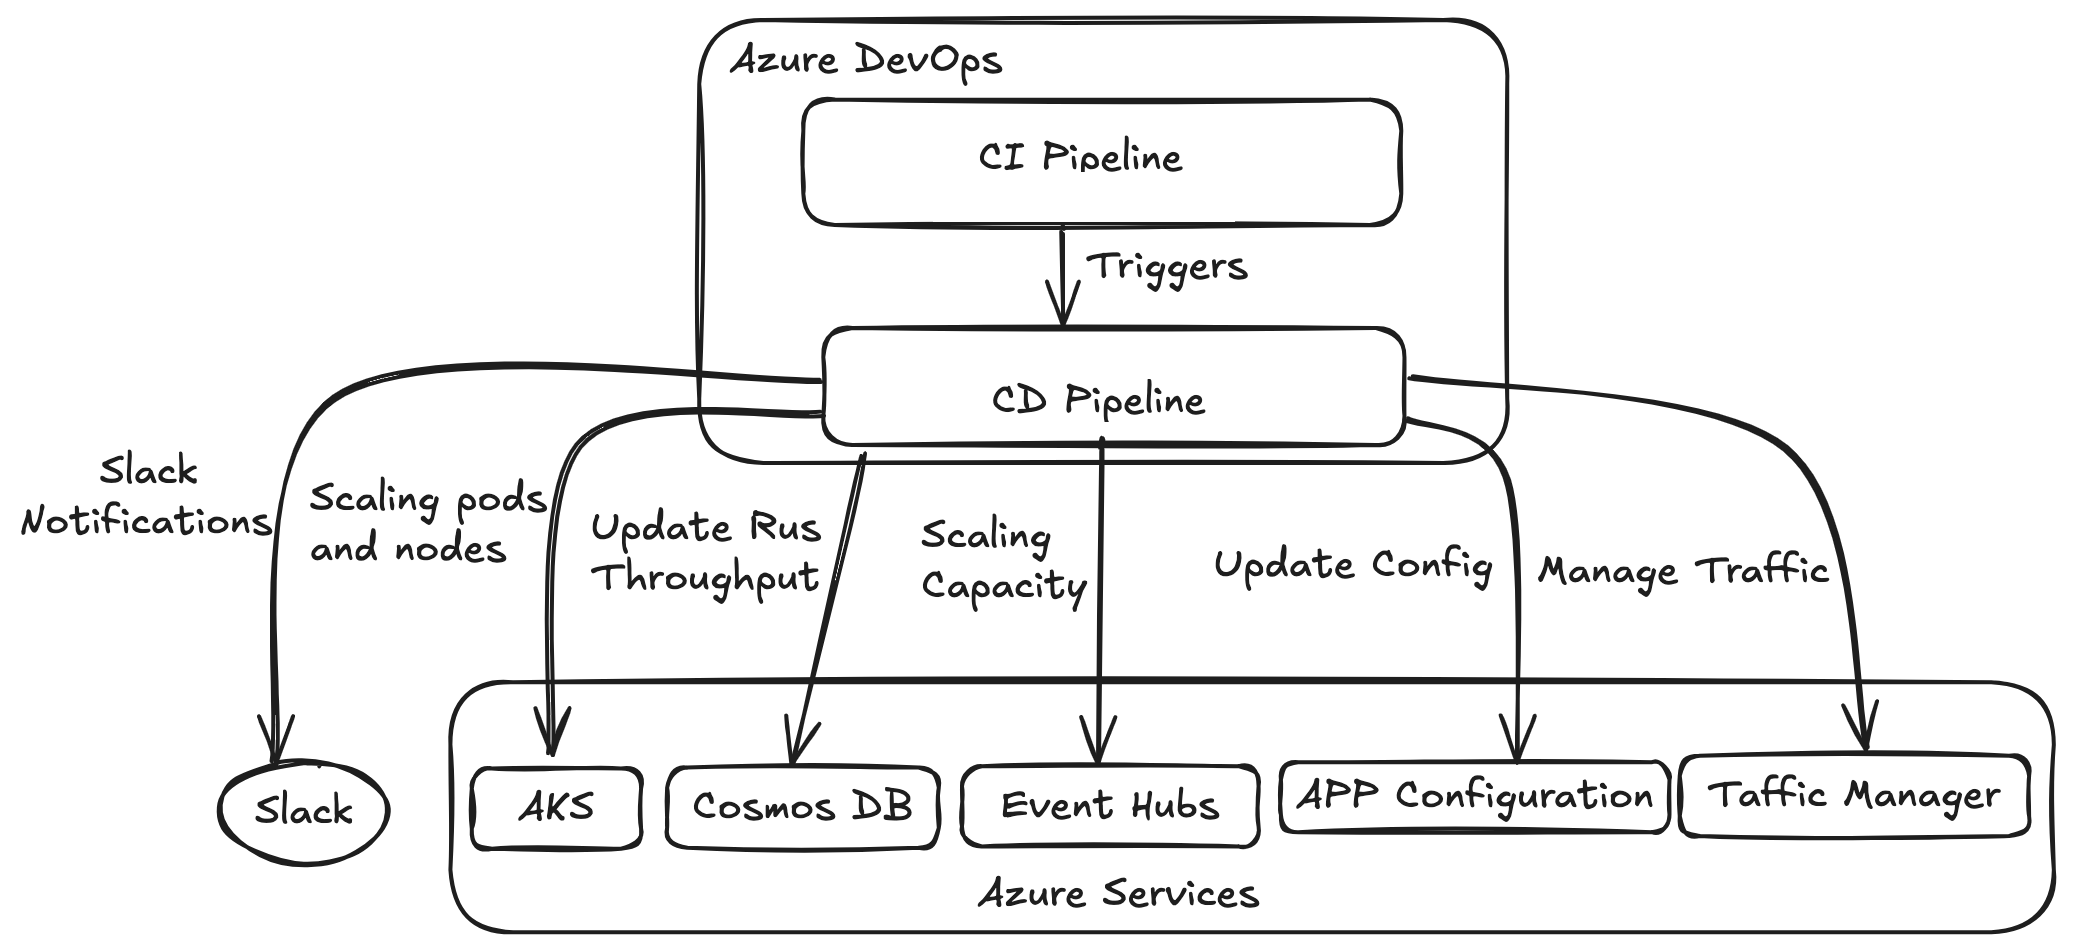
Automating the Process With CI/CD Pipelines
Leveraging Azure DevOps CI/CD pipelines is the backbone of this automation. Here’s how each part fits into the overall process:
- Continuous integration (CI): Every code commit triggers a CI pipeline that builds and tests your application. This immediate feedback loop ensures that only validated changes move forward.
- Continuous delivery (CD): Once the CI pipeline produces an artifact, the release pipeline deploys it to production. This deployment stage automatically scales resources (like Cosmos DB and Event Hubs), updates configurations, and manages traffic routing. Dynamic variables, secure service connections, and agent configurations are all set up to interact seamlessly with AKS, Cosmos DB, and other services.
- Service connections and Slack notifications: Secure service connections (using a service account or App Registration) enable your pipeline to interact with AKS and other resources. Integration with Slack provides real-time notifications on pipeline runs, scaling updates, and configuration changes, keeping your teams informed.
Core Automation Commands and Validation
Below are the essential commands or code for each component, along with validation commands that confirm each update was successful.
1. Kubernetes Pod Autoscaling (HPA)
Core Commands
# Update HPA settings:

kubectl patch hpa  -n  - patch '{"spec": {"minReplicas": , "maxReplicas": }}'

# Validate update:

kubectl get hpa  -n  -o=jsonpath="{.spec.minReplicas}{"-"}{.spec.maxReplicas}{"\n"}"

#Expected Output: 3–10
Bash Script for AKS Autoscaling
Here’s a shell script for the CI/CD pipeline. This is an example that can be adapted for other automation tasks using technologies such as Terraform, Python, Java, and others.
sed -i “s/<
echo “kubectl patch hpa $deploymentname –patch $(cat patch-template-hpa-sample-temp.json) -n $namespace”
kubectl get hpa $deploymentname -n $namespace -o=jsonpath=”{.metadata.namespace}{“:”}{.metadata.name}{“:”}{.spec.minReplicas}{“:”}{.spec.maxReplicas}{“%0D%0A”}” >> /app/pipeline/log/hpa_before_update_$(datetime).properties
#Main command to patch the scaling configuration
kubectl patch hpa $deploymentname –patch “$(cat patch-template-hpa-sample-temp.json)” -n $namespace
#Main command to validate the scaling configuration
kubectl get hpa $deploymentname -n $namespace -o=jsonpath=”{.metadata.namespace}{“:”}{.metadata.name}{“:”}{.spec.minReplicas}{“:”}{.spec.maxReplicas}{“%0D%0A”}” >> /app/pipeline/log/hpa_after_update_$(datetime).properties
rm -f “patch-template-hpa-sample-temp.json” “patch-template-hpa-sample-temp.json”.bak
done < $INPUT
IFS=$OLDIFS
tempVar=$(cat /app/pipeline/log/hpa_before_update_$(datetime).properties)
curl -k –location –request GET “https://slack.com/api/chat.postMessage?token=$(slack_token)&channel=$(slack_channel)&text=——HPA+POD+Count+Before+update%3A——%0D%0ANamespace%3AHPA-Name%3AMinReplicas%3AMaxReplicas%0D%0A${tempVar}&username=
tempVar=$(cat /app/pipeline/log/hpa_after_update_$(datetime).properties)
#below line is optional for slack notification.
curl -k –location –request GET “https://slack.com/api/chat.postMessage?token=$(slack_token)&channel=$(slack_channel)&text=——HPA+POD+Count+After+update%3A——%0D%0ANamespace%3AHPA-Name%3AMinReplicas%3AMaxReplicas%0D%0A${tempVar}&username=
#!/bin/bash
# File: scaling-pipeline-details.sh
# Input file format: namespace:deploymentname:min:max

echo "Logging all application HPA pod count before update"
kubectl get hpa --all-namespaces -o=jsonpath="{range .items[*]}{.metadata.namespace}{":"}{.metadata.name}{":"}{.spec.minReplicas}{":"}{.spec.maxReplicas}{"\n"}{end}"
cd $(System.DefaultWorkingDIrectory)$(working_dir)
INPUT=$(inputfile)
OLDIFS=$IFS
IFS=':'
[ ! -f $INPUT ] && { echo "$INPUT file not found"; exit 99; }
while read namespace deploymentname min max
do
echo "Namespace: $namespace - Deployment: $deploymentname - min: $min - max: $max"
cp $(template) "patch-template-hpa-sample-temp.json"
sed -i "s/<>/$min/g" "patch-template-hpa-sample-temp.json"
sed -i "s/<>/$max/g" "patch-template-hpa-sample-temp.json"
echo "kubectl patch hpa $deploymentname --patch $(cat patch-template-hpa-sample-temp.json) -n $namespace"
   kubectl get hpa $deploymentname -n $namespace -o=jsonpath="{.metadata.namespace}{":"}{.metadata.name}{":"}{.spec.minReplicas}{":"}{.spec.maxReplicas}{"%0D%0A"}" >> /app/pipeline/log/hpa_before_update_$(datetime).properties

#Main command to patch the scaling configuration
kubectl patch hpa $deploymentname --patch "$(cat patch-template-hpa-sample-temp.json)" -n $namespace

#Main command to validate the scaling configuration
   kubectl get hpa $deploymentname -n $namespace -o=jsonpath="{.metadata.namespace}{":"}{.metadata.name}{":"}{.spec.minReplicas}{":"}{.spec.maxReplicas}{"%0D%0A"}" >> /app/pipeline/log/hpa_after_update_$(datetime).properties
rm -f "patch-template-hpa-sample-temp.json" "patch-template-hpa-sample-temp.json".bak

done < $INPUT
IFS=$OLDIFS
tempVar=$(cat /app/pipeline/log/hpa_before_update_$(datetime).properties)
curl -k --location --request GET "https://slack.com/api/chat.postMessage?token=$(slack_token)&channel=$(slack_channel)&text=------HPA+POD+Count+Before+update%3A------%0D%0ANamespace%3AHPA-Name%3AMinReplicas%3AMaxReplicas%0D%0A${tempVar}&username=&icon_emoji="
tempVar=$(cat /app/pipeline/log/hpa_after_update_$(datetime).properties)

#below line is optional for slack notification.
curl -k --location --request GET "https://slack.com/api/chat.postMessage?token=$(slack_token)&channel=$(slack_channel)&text=------HPA+POD+Count+After+update%3A------%0D%0ANamespace%3AHPA-Name%3AMinReplicas%3AMaxReplicas%0D%0A${tempVar}&username=&icon_emoji="
Create file: patch-template-hpa-sample.json
{"spec": { "maxReplicas": <>,"minReplicas": <>}} 2. Cosmos DB Scaling
Core Commands
This can be enhanced further in the CI/CD pipeline with different technologies like a shell, Python, Java, etc.
# For SQL Database:

az cosmosdb sql database throughput update -g  -a  -n  --max-throughput

# Validate update:

az cosmosdb sql database throughput show -g  -a  -n  --query resource.autoscaleSettings.maxThroughput -o tsv

#Expected Output: 4000

#Input file format: resourceGroup:accountName:databaseName:maxThroughput:dbType:containerName
Terraform Code for Cosmos DB Scaling
# Terraform configuration for Cosmos DB account with autoscale settings.

resource "azurerm_cosmosdb_account" "example" {
 name                = "example-cosmosdb-account"
 location            = azurerm_resource_group.example.location
 resource_group_name = azurerm_resource_group.example.name
 offer_type          = "Standard"
 kind                = "GlobalDocumentDB"
 enable_automatic_failover = true
 consistency_policy {
   consistency_level = "Session"
 }
}

resource "azurerm_cosmosdb_sql_database" "example" {
 name                = "example-database"
 resource_group_name = azurerm_resource_group.example.name
 account_name        = azurerm_cosmosdb_account.example.name
}

resource "azurerm_cosmosdb_sql_container" "example" {
 name                = "example-container"
 resource_group_name = azurerm_resource_group.example.name
 account_name        = azurerm_cosmosdb_account.example.name
 database_name       = azurerm_cosmosdb_sql_database.example.name
 partition_key_path  = "/partitionKey"
 autoscale_settings {
   max_throughput = 4000
 }
}
3. Event Hubs Scaling
Core Commands
This can be enhanced further in the CI/CD pipeline with different technologies like a shell, Python, Java, etc.
# Update capacity:

az eventhubs namespace update -g  -n  --capacity  --query sku.capacity -o tsv

# Validate update:

az eventhubs namespace show -g  -n  --query sku.capacity -o tsv

#Expected Output: 6
4. Dynamic App Configuration Updates
Core Commands
This can be enhanced further in the CI/CD pipeline with different technologies like a shell, Python, Java, etc.
# Export current configuration:
az appconfig kv export -n --label 5. Traffic Management and Disaster Recovery (Traffic Switch)
Core Commands
This can be enhanced further in the CI/CD pipeline with different technologies like a shell, Python, Java, etc.
# Update endpoint status:

az network traffic-manager endpoint update --endpoint-status  --name  --profile-name  --resource-group  --type  --query endpointStatus -o tsv

# Validate update:

az network traffic-manager endpoint show --name  --profile-name  --resource-group  --type  --query endpointStatus -o tsv

#Expected Output: Enabled

#Input file format: profileName:resourceGroup:type:status:endPointName
Terraform Code for Traffic Manager (Traffic Switch)
resource "azurerm_traffic_manager_profile" "example" {
 name                = "example-tm-profile"
 resource_group_name = azurerm_resource_group.example.name
 location            = azurerm_resource_group.example.location
 profile_status      = "Enabled"
 traffic_routing_method = "Priority"

 dns_config {
   relative_name = "exampletm"
   ttl           = 30
 }

 monitor_config {
   protocol = "HTTP"
   port     = 80
   path     = "https://dzone.com/"
 }
}

resource "azurerm_traffic_manager_endpoint" "primary" {
 name                = "primaryEndpoint"
 profile_name        = azurerm_traffic_manager_profile.example.name
 resource_group_name = azurerm_resource_group.example.name
 type                = "externalEndpoints"
 target              = "primary.example.com"
 priority            = 1
}

resource "azurerm_traffic_manager_endpoint" "secondary" {
 name                = "secondaryEndpoint"
 profile_name        = azurerm_traffic_manager_profile.example.name
 resource_group_name = azurerm_resource_group.example.name
 type                = "externalEndpoints"
 target              = "secondary.example.com"
 priority            = 2
}Explanation:
These Terraform configurations enable autoscaling and efficient resource allocation for Cosmos DB and Traffic Manager. By leveraging IaC, you ensure consistency and optimize costs by provisioning resources dynamically based on demand.
How to Reduce Azure Costs With Auto-Scaling
Automation improves operational efficiency and plays a key role in cost optimization. In a microservices ecosystem with hundreds of services, even a small reduction in over-provisioned resources can lead to substantial savings over time. By dynamically scaling resources based on demand, you pay only for what you need.
By dynamically adjusting resource usage, businesses can significantly reduce cloud costs. Here are concrete examples:
- Cosmos DB Autoscaling: For instance, if running 4000 RU/s costs $1,000 per month, reducing it to 1000 RU/s during off-peak hours could lower the bill to $400 monthly, leading to $7,200 in annual savings.
- AKS Autoscaler: Automatically removing unused nodes ensures you only pay for active compute resources, cutting infrastructure costs by 30%.
Visualizing the Process: Sequence Diagram
To further clarify the workflow, consider including a Sequence Diagram. This diagram outlines the step-by-step process, from code commit to scaling, configuration updates, and notifications, illustrating how automation interconnects these components.
For example, the diagram shows:
- Developer: Commits code, triggering the CI pipeline.
- CI pipeline: Builds, tests, and publishes the artifact.
- CD pipeline: Deploys the artifact to AKS, adjusts Cosmos DB throughput, scales Event Hubs, updates App Configuration, and manages Traffic Manager endpoints.
- Slack: Sends real-time notifications on each step.
Such a diagram visually reinforces the process and helps teams quickly understand the overall workflow.
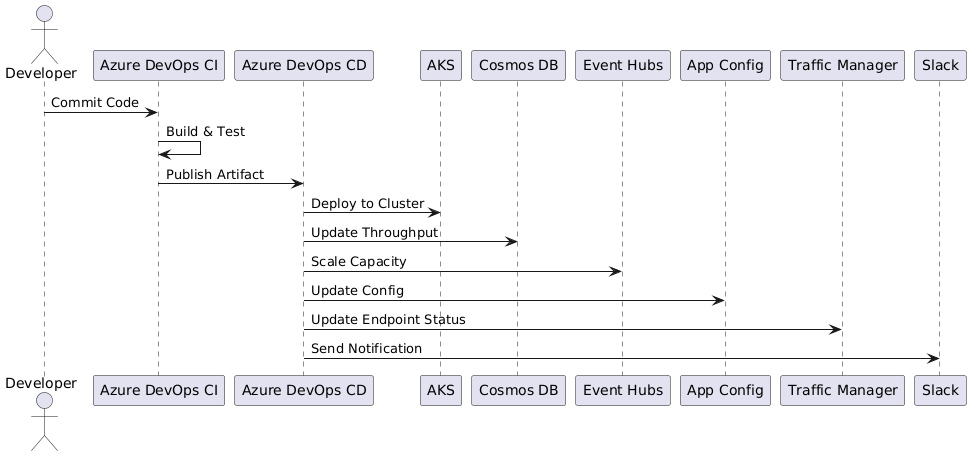
Figure 4: Sequence Diagram — A step-by-step flow illustrating the process from code commit through CI/CD pipelines to resource scaling and Slack notifications.
Conclusion
Automation is no longer a luxury — it’s the cornerstone of resilient and scalable cloud architectures. In this article, I demonstrated how Azure resources such as Cosmos DB, Event Hubs, App Configuration, Traffic Manager, and AKS can be orchestrated with automation using bash shell scripts, Terraform configurations, Azure CLI commands, and Azure DevOps CI/CD pipelines. These examples illustrate one powerful approach to automating microservices operations during peak traffic.
While I showcased the Azure ecosystem, the underlying principles of automation are universal. Similar techniques can be applied to other cloud platforms. Whether you’re using AWS with CloudFormation and CodePipeline or Google Cloud with Deployment Manager and Cloud Build, you can design CI/CD workflows that meet your unique needs. Embrace automation to unlock your infrastructure’s full potential, ensuring your applications not only survive high-demand periods but also thrive under pressure.
If you found this guide helpful, subscribe to my Medium blog for more insights on cloud automation. Comment below on your experience with scaling applications or share this with colleagues who might benefit! Your feedback is invaluable and helps shape future content, so let’s keep the conversation going.
Happy scaling, and may your holiday traffic be ever in your favor!
